I am extremely happy to announce that my Shoemaking Courses Online platform is reaching new heights. I intend to offer four excellent shoemaking classes that I believe are now lacking. It will make this platform unbeatable with everything you need to be an expert in pattern design, shoe development, and the capacity to create whatever you desire.
These 4 courses are:
1. Dr. Martens Style Boots Course[ Is open Now]
2. Loafers Making Course [ Is open Now]
3. Comfort Birkenstock Style Sandals Course
4. Kid's Unisex T- Bar shoe Course
The first course I will launch in early May, and you will find out which one at the end of this article. What you should know is that you will have a fantastic opportunity to enroll with an excellent deal.
Before I go into each of these courses in detail (keep reading; you are going to love learning them all), describing the benefits of each and how they will help you become a great shoemaker, I'd want to describe how all of these courses would be completed.
Step by step shoemaking process
If you're already aware of my approach to teaching shoemaking, you should know that I didn't leave out or hide any detail of the shoemaking process. I am convinced that if you know every little, even overlooked element, such as the scored center line in the shoe pattern, you will be able to construct any shoe type without my assistance, and if you make mistakes, you will be able to recognize and correct them on your own. This is how students of online shoemaking courses create their outstanding footwear, as you can see by looking at their work.


So, to keep things brief, let's speak about the shoe-making process itself.
1. In each of these courses, we will begin by applying the shoe design to the shoe last, whether it is a pair of Dr.Martin's boots or Loafers, Birkenstock sandals, or children's shoes.

2. I will go through every step of the pattern-creating process as well as the specifications for each of these footwear designs. We will create a basic pattern, then check it and develop upper and lining patterns.

3. We'll make the upper and lining out of leather. I'll explain which leather kind is suitable for specific shoe styles and how to cut it. You will learn how to assemble and stitch all of the footwear's components.

4. The next stage is to make stiffeners, if necessary.
We don't require stiffeners in the sandals, but we do need some additional interior reinforcements.
We will make insoles made of cardboard or leather. Keep reading to find out what you can learn about insoles in the Birkenstock sandals course.


5. Our following stage in shoe making, regardless of shoe type, would be the lasting procedure. It is one of the most remarkable processes in shoemaking since this is the first time you will see how your shoes appear with a genuine shape, such vivid 3d objects, and you will feel satisfied and amazed. Yes, you will, since you will not be sorry if you follow my instructions on how to pull and attach the upper and lining, with everything in between, to the insole.
6. Then comes the sole-making step. There are several sole varieties and procedures, and each of the shoe courses listed above will teach you about its unique specialty.
I personally enjoy working with vegetable-tanned leather and have several different shoe courses where I teach different sole-creating designs and processes, but I know that many of you would benefit from knowing how to deal with rubber soles, so I will teach this in one of the future courses as well.

7. The process of creating heels may be extremely pleasurable if you know how to deal with the materials used and how to use tools, particularly a knife. But don't worry, if you believe the method is too hard or time-consuming, you can always utilize ready-made heels. However, I believe that understanding how to build your own heels would provide you more freedom when constructing shoes, especially given how difficult it is to find proper heels for your shoe last.
Believe me, from my personal experience, finding good heels is a tough task, therefore I prefer to create my own from wood or leather, as do my students.


8. The finishing process includes the production of sock linings (if necessary, in sandals we will use a different method) and cleaning and polishing the shoe. We'll have a lovely pair of shoes with just a few drops of wax.


You should be aware that all of the pattern techniques and shoe-making processes used in the development of each of those footwear types are based on simple tools that you may acquire in your local shop. This is one of the approaches that I created over time to make everything as simple as possible.

Now let’s start with short technique specifications of each of the footwear types.
1. Dr.Martins Style Boots Course
Boots, boots, and more boots. I adore this kind of footwear. Tons of designs and types are available, with Dr. Martins's style boots being the most popular in recent years. Yes, they are comfy, and safe, and go with practically any clothing. Both men and women enjoy wearing them.
So, from a professional standpoint, here is what they have:
1. They are all constructed of strong, sturdy leather and have laces. Their design is built on the basis of a derby shoe. Who doesn't know, this is a structure in which quarters (side sections with laces) are sewed to the front-vamp part and have a free opening?

2. You are aware that boots may have any top line height, and in my current courses "High top boot course" and "Ankle boots," I explain how to make boots with certain top-line heights. So, in this course, I will teach boot pattern building with 1/3 height, which means till the 1/3 of your leg.

3. Stitched-down sole construction
Except for stitched-down construction, my shoemaking courses platform has practically all potential shoe sole constructions. This is one of the primary reasons I provide the course. This shoe sole construction appears to be simple, but it is not. It has a solid enough construction, so don't be misled by numerous youtube DIY project directions. You will learn correct, professional shoe building that you may adapt to any other style of shoe.
To put it simply, stitch-down construction is a method of construction in which the lining is pulled and linked to the insole while the upper is manually sewn to the additional layer that comes over the insole.

4. In Martin’s style boots we will use a rubber shoe sole. As previously said, soles may be created from a variety of materials using a diversity of designs and techniques. Having said that, in this course, I will teach you how to work with a simple rubber sole that you can get from an Etsy store, for example.

2. Loafers Making Course
1. Versatility of design
Whoever you are, wherever you live, and whatever you do, you will undoubtedly like making this shoe model. This shoe type has so many different designs that it may be elegant footwear while also readily converting to casual/sporty style footwear by simply changing the shoe sole design.
We see many designs of loafers everywhere, and both men and women wear them, so this unisex shoe design will suit everyone and is appropriate for any kind of occasion.


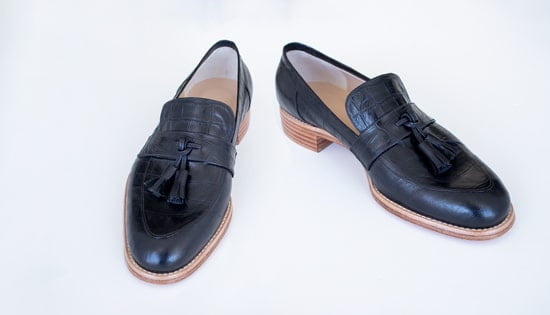
More than that, you may create a number of the upper designs. The basic structure is always the same, but different extra components, such as decorative pockets, decorations, laces, or tassels, are added. Knowing one of them will provide you the opportunity to create a variety of loafer designs.
In this course, you will learn loafers with tassels. It is one of the most beautiful loafers ever, in my opinion.
2. Particular pattern-making method
As previously said, the primary construction of all these diverse loafer designs is the same: the vamp is divided into two parts, the top part of which mimics the shape of the shoe last and is sewed to the second section, which represents the major part, including sides and back part.
Because one-half of the vamp reflects the shoe last shape, it must be done very precisely, and it is also critical to select the shoe last with the toe shape that you wish for.
As an example, if you work with a rounded toe shape, you will receive loafers with a rounded front line; if you work with a narrower, pointed-like toe shape, you will get the same shape in the front area of your loafers.

3. You will learn how to make loafers with tassels. To make these lovely shoe accessories quickly and easily, you should be familiar with several shoemaking techniques. You may later build loafers without them, only with decorative pockets or laces instead of tassels.
Because of its adaptability, I picked this design above other loafer designs.
4. In this class, I'll show you how to make a magnificent leather shoe sole or a thick extra rubber sole with a welted appearance. Both shoe sole techniques have their benefits for you.
The leather sole-making approach will make your loafers appear to be elegant footwear, while the second shoe sole-making method will make your loafers appear to be casual/sportive shoe types.
3. Comfort Birkenstock Style Sandals Course
Sandals are one of my favorite shoe styles, and I hope you share my enthusiasm for this style. Anyway, I picked this Birkenstock-style sandal design because of its distinctive insole type. So let’s start with this unique characteristic.
1. Molded comfortable cork insoles
The original Birkenstock sandals have this cork insole with the edges overlapping like a wall near the beginning of the foot.

The entire insole is formed of molded cork, which means they injected some resin liquid with cork particles. And this material is created in a metal mold that is shaped like a foot.
Later, they simply wrap the upper around the insole, which already contains a portion of the heel. The heel height is low, no more than 1-1.5 cm, but when combined with the front component that serves as a platform with a thickness of 1-1.5 cm, the heel height increases to 3cm.
The thick flexible nature of the cork insole makes it particularly pleasant for the wearer since the natural curves of the foot bottom are generated under pressure from the body.
Of course, we will not inject anything during my course, but I will show you an alternate method that I developed for creating cork-molded insoles. All you need to make these cork insoles is a nice sandal last and sheets of cork. Again, as previously said, we will deal with simple shoemaking tools, so don't be worried.
2. Upper without lining
You'll adore this method to create an upper without lining. It has its own specifications and methodology, so don't overlook it.
3. Sandal design with big buckles
These sandals are designed with three large buckles, which must be placed with proper proportions and in the proper location to be comfortable and not annoy your feet.

4. Kid's Unisex T- Bar shoe Course
If you have kids, you will adore making pairs of super comfortable shoes for your children.
There are special needs for kids’ footwear that we need to follow to obtain comfortable shoes.
Just imagine that you could be able to make beautiful shoe designs for your kids, with any color, using only quality materials with great care to comfort.
1. T-bar shoe design
This, like all of the previous footwear types I mentioned, has a unisex design.
It has a T-bar sector in the middle for fastening, as well as an elastic band for added comfort. The dimensions of a child's foot differ from those of an adult's. They have this puffiness and fullness about them. So we don't have to overlook that while constructing children's shoes.

2. Durable but soft and comfortable especially for kids' footwear needs
If you purchase your children some loose slippers or flip-flops, you are doing them a disservice. It requires more work from the child's feet while walking and may be harmful. Sturdy, well-made footwear will also give sufficient support for children's ankle bones.
As a result, the child's shoes must be both solid and soft. The stability will be given by leather stiffeners that must be placed within the upper and soft, with foam components in the rear portion design providing the necessary softness.
So, in this course, you will learn how to create children's shoes according to the standards.
3. Stitched-down construction
I won't go over what I've already said regarding the stitch-down construction of Dr. Martin's footwear. We will use the same sole structure in this kid's shoe-making course.
Our youngsters want solid, stable shoe bottoms with a nonslip surface.
All 4 outstanding shoe-making courses will be released in the following months, so if you want to join my 1 Year Shoemaking Pro, this is a fantastic opportunity for you. You will have everything you need to be a real shoemaker and designer because one of the courses of my program also is a Footwear Design Course where I teach a shortcut system on how to design your own footwear. You will have a total of 25 shoemaking classes.


How can I sign up to design course? do I need to pay for it separately ?
Footwear design course is not included in memberships, only 1-year program.
Design course
https://www.shoemakingcoursesonline.com/footwear-design-course-knowledge-technique-freedom/