
Today we finished working on our Women Oxford shoes and it was a long course( 15 lessons) but I know it was an interesting model for most of you to make. There are much more new shoe making techiques, new shoe pattern constructions in all my shoemaking courses online.
But today I want to share with you a very simple way to upgrade your shoe sole using the just ordinary utility knife, and I will show you on my fresh made Oxford shoes. Remember, for effortless work with a utility knife, it's essential to keep it consistently sharp, just like any other shoemaking knife and here is a shoemaking tutorial where you can learn how to sharpen knife.
Finished Women Oxford Shoes
Upgrade your shoe sole using the utility knife
This is really simple and not complicated process that any of you can do, to upgrade your shoe sole. We will not use any special tools to do it, and this is unconventional shoe making an approach that I always support. So let's get right to the business.
1. Duplicate Shoe Sole Pattern

Take the shoe sole pattern of your shoes and make a copy of it from cardboard. Note: If you don't have the original sole pattern, attach adhesive tape to the sole bottom, coppy the outline and transfer it to the cardboard.
2. Heel Tap

Measure 4.5 cm perpendicular line ( 90 degrees) to the center line of the shoe sole and draw the line. This line will be our edge of the heel tap.
3. Heel Tap Illusion

Draw thin 1 mm strips at the heel, with the 5mm distance between each strip. This way we will create an illusion of a shoe tap.
4. Divide The Sole Pattern

Mark along the central line strips with a height of 1 mm and at a distance of 1 cm between each of them.
5. Cut Out The Pattern

Now you have to cut out all 1mm strips on the pattern. Remember not to cut the strips all the way to the edges of the pattern ( see example in the picture).
6. Place And Attach

Place thin strips of adhesive tape on your pattern and glue it exactly to the borders of your shoe sole.
7. Mark The Form
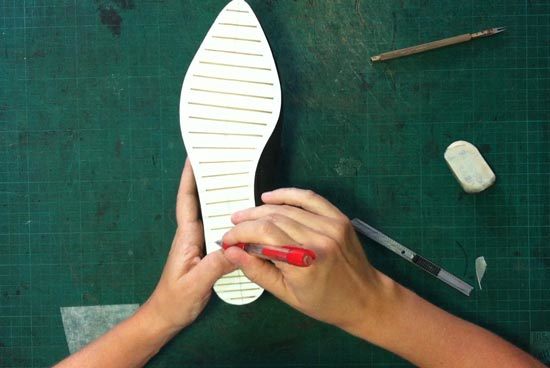
Using the pencil, mark the strips on the bottom of your shoe sole.
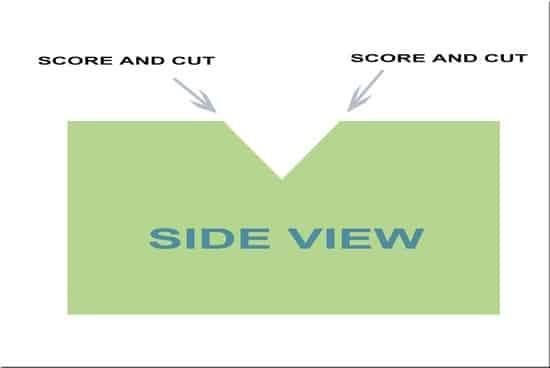
8. Score And Cut
 2
2Decline your utility in 45 degrees angle and just score the shoe sole. You must do it from both sides and this way you will create a very small channel.
Note: don't make deep cuts. See the infographic below.
That is it! Very simple and you didn't have to use any special tools to make it.
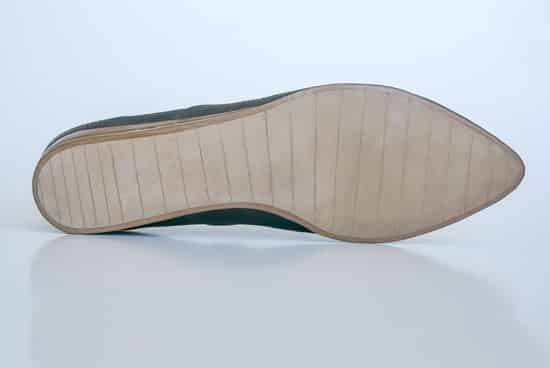
Nice, isn't it?
I love finding simple and creative solutions in my work and wish the same to you. And if you want to get more useful and effective shoemaking tips, check this shoe making article: "How to make shoes-Best Free Shoe Making Tips And Tutorials For Beginners".
If you liked this shoe making creative solution share it with someone else how you know will find it useful.
It requires a good hand to score and cut both side at 45 degree angle, but I must agree it adds grip and value to the shoe. I believe you would need a fairly soft rubber sole to insert this cutting We have a client with one deformed foot who we are making a ladies oxford shoe after showing her the images of the shoe you made she has advised us to make her one like that.
Yes you are right, you do need a good hand for this work, but this skill is something you learn after practice and more practice like everything in shoe making. It is interesting that you are using this on rubber sole for you clients ,great!
I love these little details.
I did something similar on some court shoes that were loosely based on aeroplanes.
I cut longitudinal grooves along the black resin sole using a basic lino cutting tool.
Thank you Ben. Yes, God is in the detail! I personally find it very important and that is what makes the change specially in footwear.
I’m not much experienced in shoe making, so I don’t see the value of doing this. The first commenter says it adds grip. That would make some sense. Does it make the sole more flexible? It’s not clear to me why this would be good to do, except possibly that it adds flexibility as well as grip? Could you say more about that?
Hi,
No, it will not make it flexible as the cuts are not deep. It does adds grip as all the leather soles are very smooth. More than this, it adds to the overall design of the sole and the shoe. For the same reason you can ask why do we color the sole or why you have decorative elements on footwear.
Hello,
Where can I find material for shoe soles.
Thank you.
Hi, did you checked the Shoe Making supplies page?
https://www.shoemakingcoursesonline.com/shoe-making-supplies/
You’re full of idea, really talented. I don’t buy smooth surface shoe soles for my works, but with this your tutorial, any sole goes. I will try to upgrade my shoe soles now, well explained, well understood. Wonderful Sveta.
Hi Sveta
I watch you all the time and all your you tube clips have been very help full, thank you for sharing your knowledge, i have achieved much and are constantly inspired by your craft passion and willingness to teach us all.
Sveta, I'm doing wooden heels on my shoes because we battled with resources here in South Africa any advice on how to correctly measure the heel height plus the slant with which I constantly battle with