How to make heels? In Shoemaking you have different ways and techniques to create heels, working with different materials, and different techniques of construction.
In this shoe making post I want to focus on one of the most common and accessible natural materials - leather and how to make heel with leather.
Just before I will dive in, here is what you will learn in this shoe making post.- Video tutorial - explaining each technique
- 4 Approaches of how to make heels
- How to measure your heel height
- Stacked heel calculation
There are few shoe making approaches of heels making, working with leather and now I want to share with you some of them.
Each of these heel making approaches is very detailed and here I will show you only the main steps of each of them.
Common, I can't and won't show you here the full process of heel making.
That's why I created my courses for. So just get your head around the idea of making your own heels and for full process of heel making, do yourself a favor and check my 1 Year Program.
Make leather stacked heels right away on your lasted shoes
This type of heels are build from layers of thick leather (4-5mm). The amount of layers depends on the heel hight and you if you will keep reading, you will learn how to measure the heel height of your shoe last.
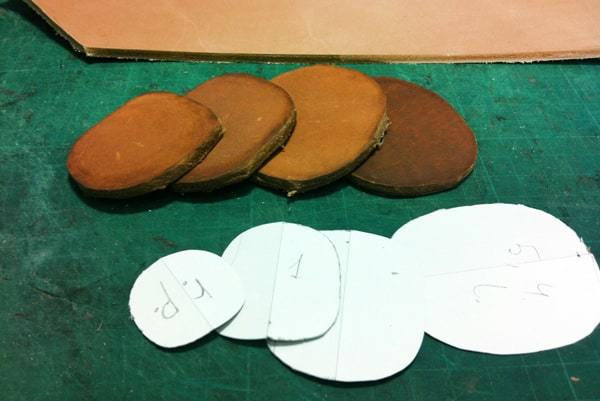
- Make the pattern of the heel shape that you want to make. This pattern is like a template of your heels.
If you plan to build simple square heel, you need to make only one pattern. It will repeat the shape of your shoe sole and will have certain length.
- Cut all leather layers using this pattern
- Skive the edges of each lift (layer) to create needed angle, the wedge of your heels
- Attach each lift one by one to the shoe sole
- During the attachment of the leather layers, place nails between each two layers and sand the surface with rasp, to eliminate curved shape of the shoe last.
- Cut extra of the layer’s edge
- Finish the heel surface with glass, rasp, sandpaper
- Polish
I teach how to do it step by step in "Ballet Flat Shoes Course"
Make heels apart from the lasted shoe
The difference between previous approach and this one is, that you will attach all leather layers apart from the lasted shoes.
Then you will attach almost finished leather stacked heel to the shoe sole.
The steps of heel making are the same, except one important thing:
You will need to make pattern for each layer, of course, if you want to create heels with interesting shape and not just a square shape.
Use this approach only if you want to heels with interesting shapes, for example asymmetrical shapes.
It has one big advantage on the previous method. You have the possibility to create heels almost with any shape, easy and fast.
I teach how to do it step by step in "How To Make Pumps Course"
Make a wedge heels
This approach is a combination of two methods that I described before.
To make the leather stacked wedge heels like a pro, you will need to make pattern for each leather layer. Then attach them layer by layer to the shoe bottom.
Then you will attach the shoe sole on the last layer of the wedge heel.
I teach how to do it step by step in "Oxford Shoe Course"
Adjust your ready made heel
If your ready made heels don’t fit the shoe bottom in some places (heel seet, heel breast etc), you can adjust them working with dremel drill.
Sand the heel part that you need to adjust and cover the heel with leather, if this sanded place is visible.
I repeat and say it again.
You are very limited working with ready made heels and can adjust them, only if it is a small correction.
That’s why to have good heels, the heels that you want, make them by yourself.
I teach how to do it step by step in " Bespoke Derby Handsewn Opanka Shoes Course"
How to Calculate Your Heel Height and Why it’s Important.
One of the easiest and accessible ways to make your heel is to build stacked heel from veg tan leather.
When making stack heel it’s super important to know the right height of your shoes.
Know the height of your heel and you will know how many leather pieces you need to cut.
Importance of The Heel Height
Let me draw you a picture.
You made a perfect pattern of your shoes, you checked it a thousand times and made many prototypes and you are sure that this pattern is perfect.
You lasted it correctly and made beautiful shoe sole.
But…. when you wear your shoes, you noticed that there is a gap in the back and the shoes obviously slide down from your feet, or the sides are loose regardless of your correct pattern, or the shoe back squeeze your heel.
So what did you do wrong here? Why did it happen?
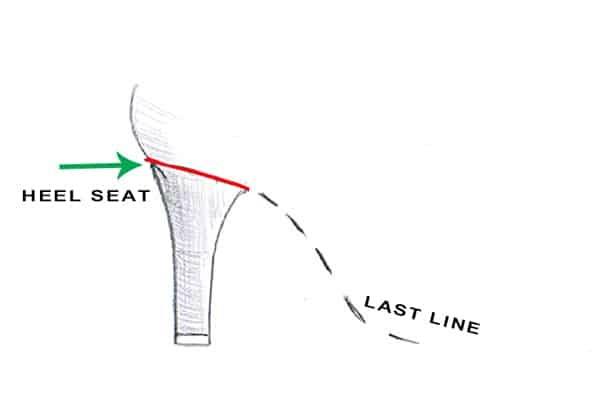
Probably, you used the wrong heel, meaning wrong heel height with the wrong angle of the heel seat.
Here are the most common mistakes:
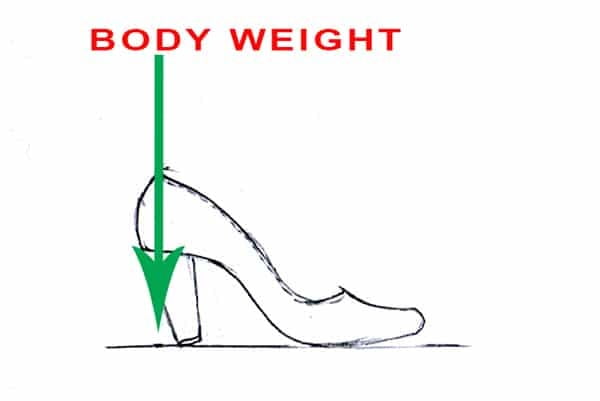
– Wrong heel height with low heel seat angle
The body weight will press your shoe down and it will push the shoe forward. This will cause pressure to your heel and your sides will open horrible loose sides.
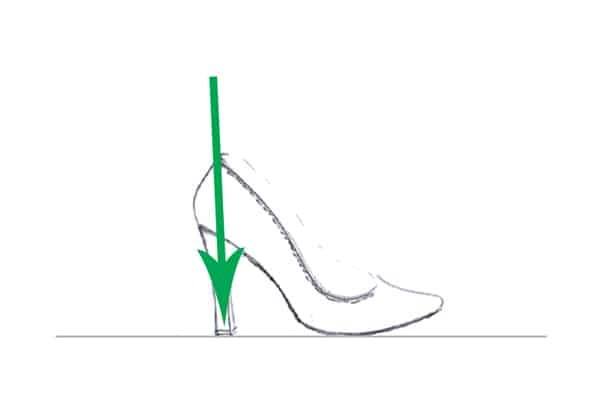
– Wrong heel height with high heel seat angle
The body weight will press the heel along the XY (see the image) and will push the back of your shoe away from your heel. This will create the gap between your heel and the back of the shoe.
To avoid those most common mistakes, and they can happen when you create your stack heel as well, you should calculate the height of the heel correctly and create a right angle of the heel seat.
There are two ways to make the stacked heel.
You can make it right away on the lasted shoe or create your heel apart from the last.
The first one is a simple way to do it and it suites for heels with simple shapes.
The second that I personally use and I teach it my courses is super practical when you understand the system. The amazing thing about this way is, by using technical drawing you can create more complex heel shapes fast and without special equipment.
The heel height calculation is important in both methods, but in this post, I will talk about the traditional way as it is easier to understand.
Height Calculation for Stacked Heel
Because you will make stacked heel from leather pieces, you should know how many layers of leather you need, to reach the right heel height. So :
1. Place the pencil under the toe of the last or lasted shoe to take into account the toe spring that every last has.
2. Take the ruler with 90 degrees angle and place it to the bottom of the heel. Measure the distance between the ground and the heel edge. This is your heel height.
3. The formula for the right number of leather layers
N=A/B
A- Heel height
B- Veg tan leather thickness
N- The number of leather layers
For example, the heel height is 20mm, the leather thickness is 5mm, so you need to cut 4 pieces for you stacked heel.
The N includes the leather strap that should flat the curved surface of the shoe sole to which you will attach first leather layer.
Well, when you will be attaching, nailing and heating on your heel it may get squeezed and reduced, so cut one extra layer.
To create a right angle of the stacked heel you should skive the edge of the leather layers until your heel will seat perfectly.
This is how it should look when you will do that.
There are different ways of heel construction and I am sure you have your own way to do it, so I would love to see it. Meanwhile, if you find it useful, share it with the world.
Now, please scroll all the way down (Under the transcript) and let me know in the comment which of the approaches you would choose for your work?


Thanks for the tips.
i am starting to make shoes, and thanks for the tips…..
Graham
You welcome!
Thank you, Sveta, sooo cool, and comes right at the time in my case ;-)) !
Great, and it’s nice to hear from you Isa.
Thank Sveta, I am joining your shoemaking online course soon.
Hi Jackson, that is great, you’re welcome to join at any time!
thanks
Great, i love this peice. i have interest in manufacturing shoes but still lack the required skills.
Hi, shoemaking is something that you can learn and you welcome to join our shoemaking courses platform.
Muchas gracias !!! tosas tus explicaciones me son de gran ayuda.
Thank you Ana.
Thanks for the tips
Thanks for all your tips. Love getting your emails!
Kindest Regards
Thanks, then I will keep them coming 🙂
Thanks for evrythings Sveta Kletina
VIelen Dank für Ihre Arbeit
Thank you!
This website is so inspiring am about to start making shoes I had little basic know but wants to learn more this site is the best eye opener… So enlightened by every thing written… Thanks so much … When I do my first sample of show will send in another comment.
How can I calculate the back seam tack of a shoe
Thank you very well explained, got it